Installation Manual
Contents of
Your Kit:
Unpack your Fusion kit to verify all parts are present: the main Fusion unit, four differently sized wrenches (16mm, 22mm, 24mm, 27mm), mounting hardware, and this installation manual.


Prepare the
Installation Area
Hold the Fusion unit against the wall to determine where it will be mounted. Make note of these points.
Clean the Wall:
Thoroughly clean the noted areas with soap and water to ensure a grease-free surface, which helps in better adherence of mounting hardware. Dry the areas completely before proceeding.


Choose the
Right Tool:
Your kit includes four wrenches to fit any shower. Find the wrench that matches the nut on your old showerhead for a perfect fit.
Remove the
Existing
Showerhead:
Unscrew the old showerhead: Attach the chosen wrench to the nut of the old showerhead. Turn counterclockwise to loosen and remove the showerhead. Be gentle to avoid any damage to the plumbing.


Verify
End Cap
Attachment
Check End Caps: Ensure that both rubber end caps are securely attached to the ends of the curtain rod. Press firmly on each cap to make sure they are snugly fitted.
Attaching the Level
Attach the level center on top of the ShowerFusion and rotate the level sideways until the level is in line with the ShowerFusion unit.

Leveling the Curtain Rod
Ensure the bubble in the level is centered between the lines to confirm the rod is horizontal. Once aligned, gently rotate the curtain rod to extend it, securing it firmly between the walls for a perfect fit. Then, carefully remove the level from the rod.

Test the Installation
Stability
After installation, pull down the middle of the curtain rod to test if it is securely fixed between the walls. If it shifts, rotate the curtain rod to tighten it further, ensuring it remains stable and well-anchored.

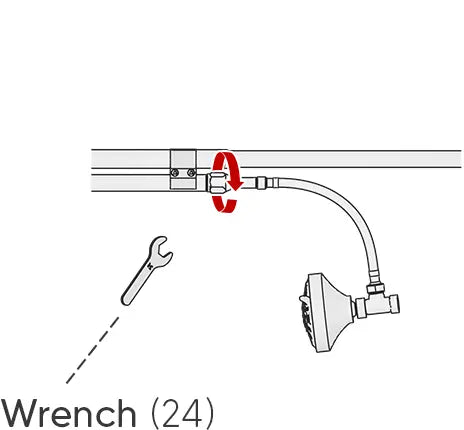
Loosen the Nut:
Use wrench (#24) to loosen the nut. This allows for adjustments to be made to the positioning of the shower head without removing it completely.


Adjust the
Rod
Length
Slide the pipe outward to the desired length. Make sure to adjust both sides evenly to maintain balance and proper function.
Remove the
Plastic Cap:
Unscrew and remove the plastic cap from the shower unit. Make sure the rubber washer stays in place for the unit to function properly.


Secure
the
Showerhead
Attach the nut with rubber washer to the water supply pipe, then tighten it securely with wrench #24.
Final
Tightening
Steps
First, tighten the main nut using the wrench provided to ensure the pipe is stable. Then, use the Allen wrench to secure the set screw on the hex nut, which will lock the pipe in place and prevent any movement.

Steps Guide
Removing the
Standard Hose
Use wrenches #16 and #24 to loosen the fittings on the current hose. Carefully unscrew and remove the hose from the unit.


Installing the
Extended Hose
Take the new, longer hose and connect it using the same fittings. Secure each end with wrenches #16 and #24, ensuring a tight and leak-free installation.
Separate
the
Clip Halves
Begin by using the provided Allen wrench to loosen and separate the two halves of the extension clip. This preparation allows for easier attachment around the ShowerFusion unit.


Attaching the
Extension Clip
Align both halves of the extension clip around the designated area of the ShowerFusion unit. Insert and tighten one screw at a time to ensure the clip is securely fastened and provides added stability.
Install
Pipe
Extension
Remove the current shower head by unscrewing it counterclockwise. Immediately install the pipe extension in its place, tightening by hand before securing it with a wrench for a stable, leak-free connection.


Attach the
Handheld
Attach the handheld shower to the newly installed pipe extension. Ensure it's screwed on tightly to avoid any leaks during use.


